Windows Home Server has good support for most newer
devices, and it’s likely that most major hardware vendors will take
steps (eventually) to update their devices and drivers to run properly
with Windows Home Server. If you use only recent, Plug and
Play-compliant devices that are compatible with either Windows Home
Server or Windows Server 2008, you should have a trouble-free computing
experience (at least from a hardware perspective). Of course, putting trouble-free and computing
next to each other is just asking for trouble. Hardware is not
foolproof—far from it. Things still can, and will, go wrong, and, when
they do, you’ll need to perform some kind of troubleshooting. (That’s
assuming, of course, that the device doesn’t have a physical fault that
requires a trip to the repair shop.) Fortunately, Windows Home Server
also has some handy tools to help you both identify and rectify hardware
ills.
Troubleshooting with Device Manager
Windows Home Server stores all its hardware data in
the Registry, but it provides Device Manager to give you a graphical
view of the devices on your system. To display Device Manager, first use
either of the following techniques:
- Select Start,
Control Panel, System (or click Start, right-click Computer, and then
click Properties), and then click Device Manager.
- Select Start, right-click Computer, and click Manage. In the Computer Management window, click the Device Manager branch.
Tip
A quick way to go directly to the Device Manager
snap-in is to select Start, Run (or press Windows Logo+R) to open the
Run dialog box, type devmgmt.msc, and click OK.
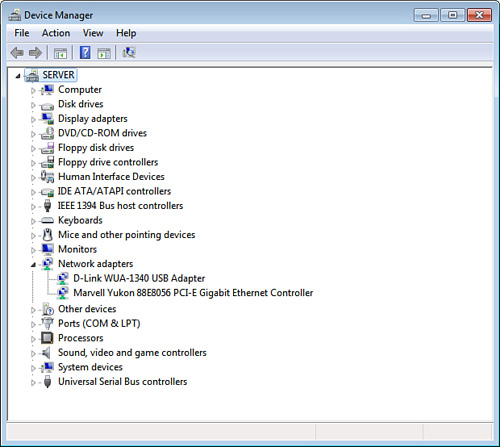
Device Manager’s default display is a tree-like
outline that lists various hardware types. To see the specific devices,
click the arrow to the left of a device type. For example, opening the
Network Adapters branch displays all the network adapter drives attached
to your computer, as shown in Figure 1.
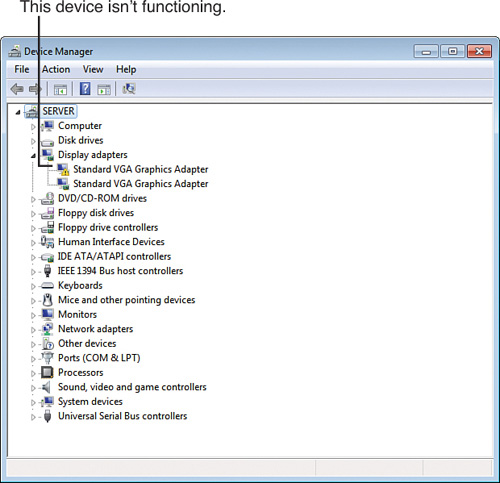
Device Manager not only provides you with a
comprehensive summary of your system’s hardware data, it also doubles as
a decent troubleshooting tool. To see what I mean, check out the Device
Manager tab shown in Figure 2. See how the icon for the Standard VGA Graphics Adapter device has an exclamation mark superimposed on it? This tells you that there’s a problem with the device.
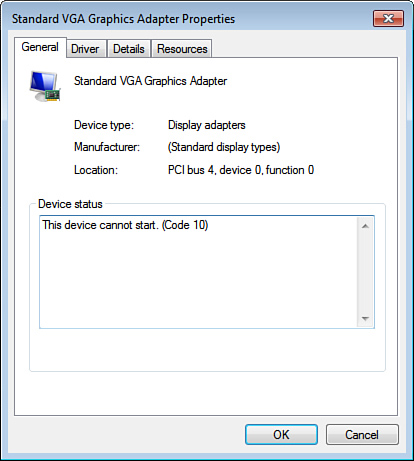
If you examine the device’s properties, as shown in Figure 3,
the Device Status area tells you a bit more about what’s wrong. As you
can see, the problem here is that the device won’t start. Either try
Device Manager’s suggested remedy or click the Check for Solutions
button to see whether Microsoft has a fix for the problem.
Note
Device Manager has several dozen error codes. See the
following Microsoft Knowledge Base article for a complete list of the
codes, as well as solutions to try in each case: support.microsoft.com/kb/310123.
Device Manager uses three different icons to indicate the device’s current status:
A black exclamation mark (!) on a yellow field tells you that the device has a problem.
A red X tells you that the device is disabled or missing.
A
blue i on a white field tells you that the device’s Use Automatic
Settings check box (on the Resources tab) is deactivated and that at
least one of the device’s resources was selected manually. Note that the
device might be working just fine, so this icon doesn’t indicate a
problem. If the device isn’t working properly, however, the manual
setting might be the cause. (For example, the device might have a DIP
switch or jumper set to a different resource.)
If your system flags a device but you don’t notice
problems, you can usually get away with just ignoring the flag. I’ve
seen lots of systems that run perfectly well with flagged devices, so
this falls under the “If it ain’t broke” school of troubleshooting. The
danger here is that tweaking your system to try to get rid of the flag
can cause other—usually more serious—problems.
Troubleshooting Device Driver Problems
Other than problems with the hardware, device drivers
are the cause of most device woes. For example, because Windows Home
Server 2011 is a 64-bit operating system, it’s possible that a device
doesn’t even have 64-bit drivers available. However, even a 64-bit
driver can cause trouble, and this is true even if your device doesn’t
have one of the problem icons that I mentioned in the previous section.
That is, if you open the device’s properties sheet, Windows Home Server
may tell you that the device is “working properly,” but all that means
is that Windows Home Server can establish a simple communications
channel with the device. So if your device isn’t working right, but
Windows Home Server says otherwise, suspect a driver problem. Here are a
few tips and pointers for correcting device driver problems:
Reinstall the driver—
A driver might be malfunctioning because one or more of its files have
become corrupted. You can usually solve this by reinstalling the driver.
Just in case a disk fault caused the corruption, you should check for
errors in the partition where the driver is installed before
reinstalling .
Upgrade to a signed driver—
Unsigned drivers are accidents waiting for a place to happen in Windows
Home Server, so you should upgrade to a signed driver, if possible. How
can you tell whether an installed driver is unsigned? Open the device’s
properties sheet, and display the Driver tab. Signed driver files
display a name beside the Digital Signer label, whereas unsigned drivers
display Not digitally signed instead.
Note
How
is it possible to install an unsigned driver when 64-bit Windows
operating systems (such as Windows Home Server 2011) require driver
signing? It’s possible because you can turn off mandatory driver signing
(for example, to install an unsigned driver that you really need to
use). You do this using the Local Group Policy Editor, which you start
by select Start, typing gpedit.msc,
and then pressing Enter. Open the User Configuration, Administrative
Templates, System, Driver Installation branch, and then double-click the
Code Signing for Device Drivers policy. Select the Enabled option, use
the list to choose Ignore, and then click OK.
Disable an unsigned driver—
If an unsigned driver is causing system instability and you can’t
upgrade the driver, try disabling the device. Right-click the device,
and then click Disable.
Use the Signature Verification Tool— This program checks your entire system for unsigned drivers.
Try the manufacturer’s driver supplied with the device— If the device came with its own driver, try either updating to the manufacturer’s driver or running the device’s setup program.
Download the latest driver from the manufacturer—
Device manufacturers often update drivers to fix bugs, add new
features, and tweak performance. Go to the manufacturer’s website to see
whether an updated driver is available.
Try Windows Update—
The Windows Update website often has updated drivers for downloading.
Select Start, All Programs, Windows Update and let the site scan your
system. Then click the Driver Updates link to see which drivers are
available for your system.
Roll back a driver— If the device stops working properly after you update the driver, try rolling it back to the old driver.
Tips for Downloading Device Drivers
Finding device drivers on the World Wide Web is an
art in itself. I can’t tell you how much of my life I’ve wasted rooting
around manufacturer websites trying to locate a device driver. Most
hardware vendor sites seem to be optimized for sales rather than
service, so although you can purchase, say, a new printer with just a
mouse click or two, downloading a new driver for that printer can take a
frustratingly long time. To help you avoid such frustration, here are
some tips from my hard-won experience:
If
the manufacturer offers different sites for different locations (such
as different countries), always use the company’s “home” site. Most
mirror sites aren’t true mirrors, and (Murphy’s Law still being in
effect) it’s usually the driver you’re looking for that a mirror site is
missing.
The temptation when you first
enter a site is to use the search feature to find what you want. This
works only sporadically for drivers, and the site search engines almost
always return marketing or sales material first. Note, too, that
occasionally these searches are case-sensitive, so bear that in mind
when you enter your search text.
Instead
of the search engine, look for an area of the site dedicated to driver
downloads. The good sites have links to areas called Downloads or
Drivers, but it’s far more common to have to go through a Support or
Customer Service area first.
Don’t try to take shortcuts to where you think
the driver might be hiding. Trudge through each step the site provides.
For example, it’s common to have to select an overall driver category,
and then a device category, and then a line category, and then the
specific model you have. This is tedious, but it almost always gets you
where you want to go.
If the site is
particularly ornery, the preceding method might not lead you to your
device. In that case, try the search engine. Note that device drivers
seem to be particularly poorly indexed, so you might have to try lots of
search text variations. One thing that usually works is searching for
the exact filename. How can you possibly know that? I’ve had good luck
using Google (www.google.com), Google Groups (groups.google.com),
or some other web search engine to search for a driver. Chances are
someone else has looked for your file and will have the filename (or, if
you’re really lucky, a direct link to the driver on the manufacturer’s
site).
When you get to the device’s
download page, be careful which file you choose. Make sure that it’s a
64-bit Windows Home Server (or Windows Server 2008 R2) driver, and make
sure that you’re not downloading a utility program or some other
nondriver file.
When you finally get to
download the file, be sure to save it to your computer rather than
opening it. If you reformat your system or move the device to another
computer, you’ll be glad you have a local copy of the driver so that you
don’t have to wrestle with the whole download rigmarole all over again.
Verifying Digitally Signed Files
I mentioned earlier that digitally unsigned drivers
are often the cause of system instabilities. To ensure that you don’t
accumulate unsigned drivers on your system, you should regularly run the
Signature Verification tool. This program scans your entire system (or,
optionally, a specific folder) for unsigned drivers. Follow these steps
to run this tool:
1. | Select Start, type sigverif, and press Enter. The File Signature Verification window appears.
|
2. | Click Advanced to display the Advanced File Signature Verification Settings dialog box.
|
3. | Activate
the Save the File Signature Verification Results to a Log File check
box (it should be activated by default), and then click OK.
|
4. | Click Start to begin the verification process.
|
When the verification is complete, the program
displays a list of the unsigned driver files, if any. The results for
all the scanned files are written to the log file Sigverif.txt, which is copied to the C:\\Windows folder when you close the window that shows the list of unsigned drivers. In the Status column of Sigverif.txt, look for files listed as Not Signed. If you find any, consider upgrading these drivers to signed versions.